Post 21 of 29 in the AZ Hive series
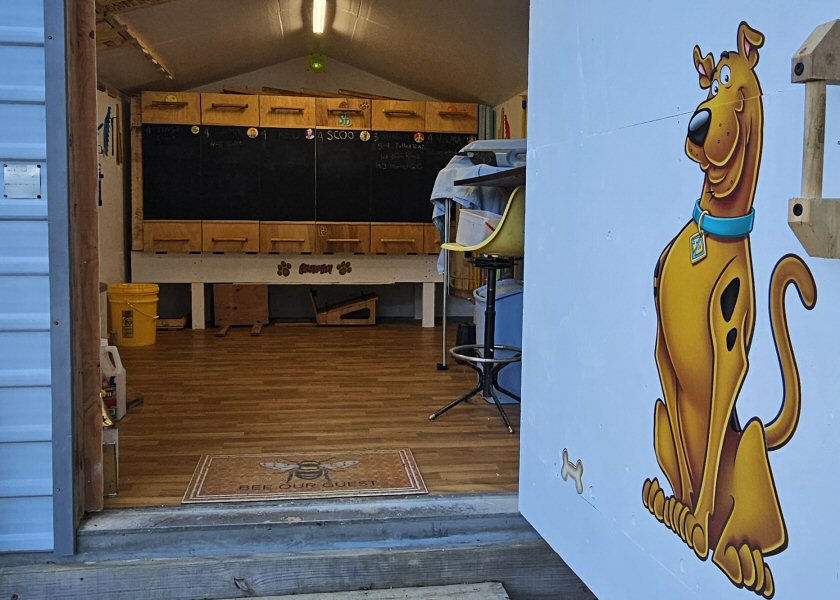
Once you walk through the door of the bee shed, the AZ design starts to make sense in a way the schematics can’t show. The hives are along one end, doors facing in. Everything else around them is organized to support the rhythm of working those hives.
Let me walk you through what’s in there.
The hives along the end wall. Six AZ hives in a row, outer doors facing into the shed. Below each hive, the base has two notches cut into it — small purpose-built spots to set accessories without them sliding around.
The Marching Board. We named this one because of what it does. It’s a small flat table that slides up tight against the hive’s bottom board. When you need to shake bees off a frame — during a swarm capture, a manipulation, or just clearing a frame for inspection — you shake them onto the Marching Board and they walk back home through the open hive door. It’s calmer than dumping them straight back in, and you can see what’s there — queen, drones, the lot — as they march by.
The frame stand. A simple rack for setting frames you’ve pulled out of the hive. Holds them upright, off the ground, easy to grab when you’re ready to reinstall. We use it heavily during inspections, and especially during honey extraction when frames are being pulled from the hive. The brackets that cradle the frames are 3D-printed in the same shape as the frame spacers, to hold the frames apart and maintain bee space.
The freezer. Originally the spot for a tall frame stand. After a year or two we realized we needed somewhere to store drawn comb that we didn’t want wax moths in, and the freezer earned its space — it doubles as drawn-frame storage and a deep-freeze for wax moth prevention. The old tall frame stand got retired. The short frame stand stayed.
Bucket-as-stool. Brood chambers are at the bottom of the hive cabinet. To inspect a bottom chamber, you don’t want to crouch — you want to sit. So we keep a short bucket nearby and use it as a stool. Cheap, sturdy, and the right height. Just make sure no bees are on it before you place your bottom on its top.
Storage everywhere. A real working shed has to absorb all the gear that beekeeping accumulates over the years. Under the desk: spare insulation panels, frames waiting to be used, foundation, hive parts. Hanging from the ceiling: inner doors and chamber separators stored flat between uses. Every available surface has a function.
The bee escape. At the peak of the shed, a small portal connects the inside of the shed to the outside. We cut it during the wall rebuild a few posts back, and ran a PVC pipe from the inside up through that hole. Inside the PVC pipe is a funnel-shaped plastic insert with small holes the bees can’t get through and a bigger hole at the point of the funnel that they can. When a bee escapes inside the shed during an inspection — and they do, every time — she flies upward (bees fly up when confused), heads toward the light coming through the pipe, walks up the funnel, and exits at the peak. From outside, you see a small round opening near the roofline; the bee entrances are along the bottom of the wall, where the bees normally come and go. The bee escape gives lost bees a way home without having to chase them around the shed.
That’s the shed, more or less. A working environment built around a row of hives, with every accessory placed exactly where it gets used. The space does everything a beekeeper needs an apiary workspace to do: house the hives, store the gear, give you somewhere to sit and work, and let escaped bees find their way out without panic on either side.
Five years in, it’s still mostly the layout we started with. A couple of small upgrades (the freezer, mainly), but the bones haven’t changed.
Next: Winter Configuration — insulation, an oxalic acid vaporizer port, and a freezer that doubles as a heater.