
Post 26 of 29 in the AZ Hive series
Up to forty AZ frames per hive at full capacity. Six hives. Plus extras for splits, swaps, and storage. Hundreds of frames to build, none of which I could buy off the shelf — AZ frames sized for Langstroth deep foundation aren’t a typical stocked item at a U.S. bee supply retailer.
So I built them.
Each AZ frame has four pieces of wood: two end pieces (the vertical sides), a top bar, and a bottom bar. Plus a foundation. Here’s how I made each part.
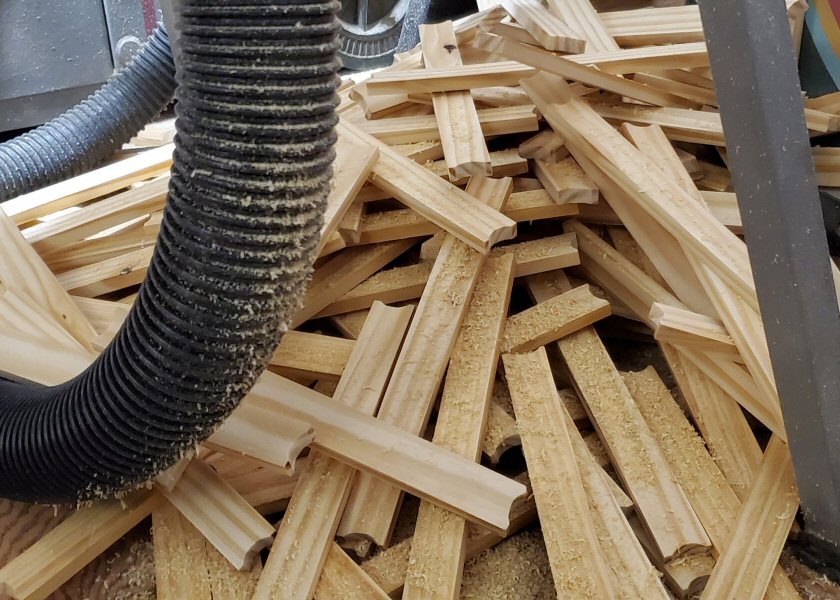
The frame ends. The vertical sides of each frame are short — nine and a half inches long — but they have a coved profile on the ends (the part that contacts the steel support rods). The cove reduces friction and discourages bees from propolizing the contact patch.
I started with 2×10 lumber. A 2×10 is wide enough to rip several 3/8″ frame-end blanks out of one width, and the wood is cheap and easy to find. The process:
- A 2×10 is 9¼” wide, so I cut it into 9½” lengths on the miter saw.
- Cove the two end-grain edges using the table saw (described below).
- Rip each piece down to 3/8″ thickness for final sizing.
A few cuts per frame end. The cove is the trickiest part because it’s a cut on end grain. Everything else is straight cuts.
Top and bottom bars. These are the horizontal pieces — the long sticks that span the top and bottom of the frame. I needed a lot of them, two per frame across all the frames.
The source for these is a little unusual. A local truss plant receives its bunked lumber banded together with 2×2 wooden strips, used to keep the band from cutting into the good wood. When a bundle is opened, those 2×2 strips are scrap. The plant was happy to let them go. I picked up enough scrap stickers to make every top and bottom bar in the apiary, with plenty left over.
The stickers needed:
- Ripped to consistent width.
- Cut to length for top and bottom bars.
- A foundation slot cut into one edge — a shallow groove the foundation slides into.
The foundation slot is just a saw cut about an eighth of an inch deep, made on the table saw. One pass per bar.
The cove cut. Coving on a table saw isn’t a normal operation. The blade is meant to cut straight grooves, not hollowed-out curves. The trick is to feed the lumber across the blade at an angle — meaning the lumber moves diagonally across the blade rather than straight along it. The angle of the feed and the height of the blade together determine the size and shape of the cove.
I built a jig — a board clamped across the saw table at the right angle — and ran each piece through using what I call a wobbly dado blade set for no wobble. One pass, and the four carbide-tipped cutter blades make quick work of it. No sanding required — just a careful, slow, steady push, never moving your hands into the guarded area. When a piece is almost through, stop and use the next piece to push the preceding one out the back.
It’s a slow process per piece, but the jig is set up once, and you can run a stack of frame ends and bars through in an evening.
Assembly. Two ends, a top bar, a bottom bar. Glue the joints, brad-nail the corners. Each frame takes a few minutes once everything is cut. Wait until the glue dries, then install the foundation.
The foundation. The Mann Lake Rite-Cell foundation I mentioned earlier in the series (SKU FN810) is sized to fit the slot in the bars. The foundation is plastic, embossed with the hex pattern, and pre-coated with wax. I clipped the corner notches for orientation, fit the sheet into the top slot, and flexed the foundation until it popped into the bottom slot.
Purchased materials, free scrap wood, and a table saw with a jig. Not exotic. Just patient.
Next: The Build, Part 3: Inner Doors — shiplapped boards, walnut handles, and hardware cloth.